Welcome to my Blog!!!

Wednesday, December 23, 2020

Letter to Santa Card

  Hello, Tomorrow is Christmas Eve.  Will be getting a few more things wrapped today. 

Still waiting on a a couple of gifts to be delivered. Getting worried that they won't get here on time.

 I wanted to share with you all the Christmas card that I made for my Mom.


 She loves Santa things, so I thought she would like this cute image of a little girl sending her letter off to Santa.

 I remember writing my letter to Santa with all the things I wanted for Christmas and then sending it off. It was so fun.

 Do you remember sending off your Christmas wish list to Santa?

I found that cute Image on Pinterest under Free Christmas coloring Images. Colored it with my Spectrum Noir & Master's Touch Alcohol Marker's. 

I wasn't for sure what color to make her dress and coat. My grand daughter suggested her coat be a dark blue and her dress red. So I went with her suggestion. 

My Mom loves sparkly things so I knew I had to add a little. So I punched the snowflake out In white glitter cardstock from Stampin Up. Added a little red sparkly ribbon behind the black and white paper and also added some silver tinsel.   

I thought the stitched red frame worked perfect around the Image. I also used the softly falling embossing folder from Stampin Up. The Santa stamp image is also from S.U.  

I think it turned out cute and I like the vintage look of it. 

For Christmas I wanted to share a recipe with you all, I thought you all might like a recipe for Apple Pie Bombs. Easy to make and really good.


Apple Pie Bombs

 Preheat oven to  375    

You will need-

One can apple pie filling

One large grands biscuits

brown sugar - 1/4th cup

cinnamon - 1/4th tsp

butter - 3 tbs.

vanilla - 1/4th tsp

cornstarch - 1/8th tsp

In medium sauce pan melt 3 Tbs. butter. Add brown sugar, cinnamon, vanilla and  cornstarch. Mix well, add pie filling. Mix and heat up. Let cool

Roll out biscuits to a 4 inch circle. Use a little flour to keep it from sticking. Spoon some apple mixture on biscuit.

 Brings sides up and pinch together. Try not to get and filling on the edges. It won't want to stick together.

Will now look like a ball. Place pinched side down in a buttered 9x13 pan.  Add a little melted butter to the tops then sprinkle a little sugar and cinnamon mixture on top. 

Bake in pre-heated oven for around 18 minutes. Be careful ,ovens vary. 


These are also good with other pie fillings like cherry, peach and blueberry. My family really likes these.

 I'm sure your family would as well. Let me know if you give them a try. 


Also Ernie the Elf will be going back to the North Pole with Santa on Christmas Eve. He has been a good elf this year. Didn't get into any mischief. He even wore a mask. Ernie is a special part of our Christmas. He has been coming since 2013.


That's it for me. Thanks for stopping by. I want to wish each and everyone of you a very Merry Christmas and remember that Jesus is the reason for the season. 💓 


 Challenges entered-  

 DL.ART - 8TH Annual Elf Antics Linky Challenge

Lets Create Challenges #166 AG + Santa Claus Is coming to town

 Tuesday Throwdown #472  Anything Goes 

Christmas with the Cuties -#45 Have yourself a very Merry Christmas

Colour Crazy Challenge #50 Anything Goes Colour challenge

2 Crafty Critter Crazies - #45 Sponsored by CCC  Must have a Critter

Creative Knockouts -#381 Anything Goes

Pennys Challenges - #486 Year end Mega Challenge

 Crafty Calendar - December- Christmas Theme

Monday, December 21, 2020

Bah HumBug 2020 Gift holder/ Ornament

  Hello Crafter's, Not to long now until Christmas. I have almost all of the presents wrapped. Still waiting for three more gifts to be delivered. Sure hope they get here on time.

For one of my daughter's gifts I am giving her some money. So I needed a money holder and instead of making an envelope I decided to make something that she could hang on the tree to remember 2020.


I thought a toilet paper roll was perfect for a 2020 money holder. The money is rolled up in toilet paper. Hope she thinks it's a little funny. 

Cut the numbers out on my Cricut. The Bah HumBug is from a stamp set made by Mr. Cricut Crazy called  Christmas, Christmas. I hot glued the little white pompoms around the top. I think they are so cute. 

To close the bottom I added red sticky tape and then used my crimper to crimp the bottom.

 Also added twine so that she could hang it on her tree. I will also be adding a little chocolate inside.

Hope you enjoyed stopping by. I will be sharing one more Christmas card. Hope you can make it back. 


Challenges entered- 

Not Just Cards - December Anything Goes

Creative Knockouts - #381 Anything Goes

Crafty Calendar Challenge December- Christmas Theme 

Pennys Challenges #486 Year end Mega challenge

Lil Patch of Crafty Friends #148 Always Anything Goes


Friday, December 18, 2020

Christmas Critter Card

  Hello, Hope your doing good. Love that you found some time to stop by. I know how busy this time of year is. 

I think I'm pretty much done Christmas shopping. Getting ready to start wrapping. I actually enjoy wrapping. But have got to have Christmas music playing and a large cup of hot coffee. Then I'm all set to go. 

So here is another one of my Christmas cards for this year. 


This one was fun and easy to put together. I used a napkin for this one and I love it. Love all those cute animals. Don't they look like they are having a super fun Christmas celebration. 


 Well I am going to start wrapping, hope you can make it back. 

Have a nice weekend. Stay Safe and happy wrapping!


 Challenge entered-

2 Crafty Critter Crazies #45 Sponsored by 2 CCC

Cardz TV #130 Anything Goes

 Lil Patch of Crafty Friends #147 Always Anything Goes 

Love to Scrap #140 Winter Wonderland

Crafty Gals Corner #214 Tis the Season

Tuesday, December 15, 2020

Christmas with kitty card

    Hello, Wanting to share with you all my first Christmas card I have made so far. I'm really behind. 

This will be for my daughter and grandkids. They have three cats so I thought they would like this cute image.


This card was made by using a napkin. Isn't it so cute? I decided not to put a sentiment on the front. Pretty sure my daughter would prefer it without one. I did add the string of tinsel with little fuzzy balls. Thought it was cute. I think it has a little vintage look to it.

I love how easy napkin cards are.  Have you tried making one yet? 

 That's all for me today. Hope you can come back for another visit. Will be sharing some more Christmas cards. 

Stay safe my friends


 Challenges entered-

Lil Patch of Crafty Friends #147 Anything Goes

Make my Monday #137 Christmas Theme 

Shopping our Stash  Black and White and Red all over 

Avenue 613 December- Anything Goes with twist- Anything Vintage

The Sisterhood of Crafters Anything Goes Christmas/ Winter 

Crafty Calendar Challenge  December- Christmas Theme


Wednesday, December 9, 2020

Floral Sympathy card w/ Bird

  Hello, Thanks for stopping by. On my last post I shared with you a Sympathy card that I made. Today I am sharing another.

  A childhood friend of mine recently passed away from Covid. This card Is for her sister.


I have been so upset over her passing. Her family lived close to mine and I had spent the night there several times. Just a wonderful family. My heart breaks for them all.

 Several people are getting it around here. Glad to hear most are recovering. The school is now doing virtual classes since there was a couple of cases of it in the school. 

I feel better knowing that my grandchildren are home. My prayers go out to all who are effected by this terrible virus also hope I don't have to make anymore sympathy cards because of it. 

Thanks again for taking the time to stop by. I will be sharing some Christmas cards soon. Hope you can make it back. Stay Safe!


 Challenge entered-

Pennys Challenges  #486 Year End Mega Challenge

Crafty Catz Weekly Challenge #530 Anything Goes

2 Crafty Critterc Cazies #45 Sponsored by 2 CCC

Crafters Cafe blog Challenge #256 Anything Goes

 Crafty Creations Challenges #416 Anything Goes  

Word Art Wednesday #468-469 Anything Goes

Cute Card Thursday -#663 Anything Goes

Saturday, December 5, 2020

With Sympathy Card

  Hoping you all are doing well and staying safe.

This horrible virus has now taken the lives of a few people that I knew. My nieces grandfather, A sweet elderly woman that I used to take care of. Both of them lived in the Nursing Home and a few weeks ago my elderly cousins wife passed. He is recovering now at home. 

It's so heartbreaking. Praying for this to end. I take comfort in knowing that God is in control and that he has a plan.

So today I wanted to share with you the Sympathy card that I made for my cousin. 


I was so sad while making this card. All of us card maker's know that Sympathy cards are the hardest one's to make. Just praying that It brings him a little comfort. 

That's all I wanted to share today. Please remember to wear your mask, wash your hands and social distance. Praying for each of you to stay safe and God bless.


 Challenges entered-

Cute Card Thursday #663 Anything Goes

Love to Craft -#53 December Anything Goes

Through the Craftroom Door - Anything Goes

Krafty Chicks Challenge #536 Week One-Stamp Act

Crafty Creations $416 December- Anything Goes

Color it Create it Show it Off December Challenge- Anything Goes

Wednesday, December 2, 2020

Baby Shark "color me" Card

  Hello, Hope you all had a nice Thanksgiving. We had a nice one, Stuffed ourselves and then stuffed our selves again the next day with left overs. Did any of you get stuffed on Thanksgiving? 

I needed another card for a little one. This time it's for my great-great nephew Easton.

His birthday theme is Baby Shark. So I decided to do another color me card. 


Found the Image on google. Printed it out, uploaded it to Design Space and the Cricut cut it out. So easy!

Thought the paper went well with it. For the strip of paper with the sentiment on it. I used the corner of a square punch and punched along the bottom to make it look like shark teeth. 

This is a quick post for me. Hope you all are doing well. Take care and stay safe!


 Challenges entered

Lil Patch of Crafty Friends - Always Anything Goes

Love to Craft  #53 December Anything Goes

Creative Crafters Challenge #34 Anything Goes 

2 Crafty Critter Crazies #45 Sponsored by CCC 

Crafters Cafe #256 Anything Goes


Tuesday, November 24, 2020

Fall Indiana Card & winnings

  Hello, Hope you all are well. It's almost Thanksgiving.I know that this Thanksgiving will be a lot different for a lot of families. Since our daughter and grand children live next door now, we will be going there. 

Wanted to share a picture of the card I made. I send out these Indiana cards with some crafty goodies to other crafter's on the Let's Make Cards Facebook group.  Fun sending them out and also fun receiving cards from all over.


 I really like the colors of the leaves on this paper. Got it from Hobby Lobby. The sentiment was made on my Cricut and then the cricut also cuts it out. 

The Indiana State Image was found on Google. Uploaded it to Cricut Design Space and cut it out. The little heart I added is from an Owl punch from Stampin Up. 


Not sure if you seen my project for the 2020 Fall/Winter Coffee Lover's Blog Hop a few post back.  It was so fun and loved hopping along. So much Inspiration. Anyway I was the comment winner from Journals for Life.They were one of the Super Sponsors. 

I was so excited and I received it in the mail the other day. It's the "But First Coffee Bundle". Oh I love It. Can't wait to play with it all.


They are having a Black Friday sale. Here is a link if you would like to check It out.   Journals for Life Stamps

 That's It for me today. Hope you all have a blessed Thanksgiving. Stay Safe!


 Challenge entered-

Pennys Challenges #484 Anything Goes using paper

A Perfect Time to Craft  #11 Anything Goes

Word Art Wednesday #466-467 Anything Goes 

Crafty Calendar Challenge November Challenge - Anything Goes

Friday, November 13, 2020

Fall Napkin Birthday Card & Monkey Bread

  We are now already about half way through November. This year seems to be flying by, and has also been one of the worst one's ever. I'm wondering if this virus well ever go away.

For today, I want to share with you the birthday card that I made for my Mom. 

It is my first ever napkin card. I had been wanting to make one for a good while. 


A sweet crafter named Brenda from the Facebook group 'Let's Make Cards' sent me this pretty napkin. I love anything with birds on it and I think this one is beautiful. 

I used a stick of purple glue that dries clear and rubbed it all over a piece of card-stock and then placed the napkin on it. 

The napkin has three layers. You only want the top layer.  I carefully used a credit card to rub it down. Then cut around leaving about a half an inch of the napkin. Trimmed the corners and glued it down. 

I thought a frame over it would be pretty, so decided to use a die from 'Spellbinders' called 'Decorative Labels'. After I cut it out I realized it was a whole piece and not a frame.

 I kept it in the die and took my exacto knife and cut around the inside edge to make a frame. 

I used shiny copper cardstock for the frame. My Mom always says one of her favorite colors is copper. 

The sentiment is stamped with More Mustard Ink and the sentiment is from a S.U set called 'Well Scripted'.  The die is from S.U. but can't recall what set.

Cardstock is white and a Bazzil Green.

I don't know if you can see, but in the bottom left hand corner of the card there are some little marks of ink. I had just got done stamping the sentiment, and my grandson was outside. He came up to the window that I had open and said "Mamaw". Well, I jumped and the block with the stamp on it went flying and bounced a few times on the craft table. I got some on the card. It could have been so much worse. You really can't tell, but I thought it was so funny. He came in thinking he was in trouble. I laughed and said It's fine. He was so relieved.

I really like how the card turned out and it was fun using a napkin. I have some other napkins. Looking forward to making some more.


This is already a long post but I wanted to share another recipe with you. I am sharing a recipe for Monkey Bread.  


 Monkey Bread

Ingredients you will need

3 cans of small biscuits or two cans of Grands

1/2 cup sugar

1/2 tsp.cinnamon


Topping

1stick of butter

3/4th cup brown sugar

2 tsp.cinnamon


Preheat oven to  350

  In small bowl mix together the 1/2 c. sugar and 1/2 c. cinnamon. set aside.

Separate biscuits, cut into fourths. Roll each piece in sugar and cinnamon mixture.   

Arrange pieces in a greased bundt pan.

Melt butter in saucepan. Stir in brown sugar and cinnamon. Cook until de solved. Pour over biscuits.

Place in preheated oven and bake for  at least 30 minutes. 

You just want to make sure the biscuits are done.


My grand daughter asked me why it's called Monkey Bread, and I told her that I had no idea. All I know is, it's delicious.

So that's it for me today. Let me know if you try the Monkey Bread. Hope you all have a wonderful day. 

Stay Safe and Stay Crafty!


 Challenges entered-

Make my Monday #135 Elegant Fall/Autumn 

2 Crafty Critter Crazies #44 Sponsored by Paper Shelter

cardzTV. #127 Anything Goes 

Crafty Creations  #415 Anything Goes 

Crafty Calendar  November Challenge Anything Goes


Friday, November 6, 2020

Fall/Winter Coffee Lover's Blog Hop


Hello paper crafter's, so glad you stopped by. I am so excited that the Fall/Winter Coffee Lover's blog hop has begun. Whooo Hooo!

I played along with the 2020 Spring/Summer blog hop, and also the 2019 Fall/Winter blog hop. So of course I didn't want to miss out on all the fun.

For my coffee project, I created a Magnetic fall/coffee note holder to give to my daughter. I had made one awhile back and she mentioned that she would like one. So I will be giving her this, along with her other birthday gifts


The Image is from Stamplorations and I love It.  I was a little nervous about making a project that needed to be colored because I don't color that often. But this image is smaller, and was really easy and fun to color.

  I used Spectrum Noir and Master's Touch Alcohol Marker's to color it. You probably can't tell, but for the leaves I tapped the markers in yellow and green to give it a two color effect. I also sponged around the whole image.

Cut the cardboard from a box. Used my Cropadile to punch holes along the side and crocheted a border. The paper I used came from a 6x6 paper pack.

Added a strip of burlap ribbon and glued a small wooden cloths pen to the front to hold notes or maybe her grocery list. Also added a little cut out leaf.

So that's my coffee project for today. I hope that you can find the time to check out this fun hop and play along. 

There are Super Sponsors, Awesome giveaways and Lots and Lots of wonderful Inspiration. 

Here is the link. Hope you play along. 

Coffee Loving Cardmakers Blog Hop


Thanks again for stopping by. Happy day to you and stay safe!


 Other challenges entered-

Stamplorations - Never ending Linky Party

Shopping our Stash - #432 Hot drinks for cold nights

Colour Crazy Challenge #44 Anything Goes, Must color 

Little Red Wagon #574 Color Me Happy 

Dis Digi Designs - Halloween or Harvest

Cardz TV. - #127 Anything Goes


Monday, October 26, 2020

Toy Story " Color Me" Birthday Card

   Hello, thanks for stopping by. It's been colder and wet here in Indiana. Blah! 

It will soon be Halloween and I haven't made anything yet. I have so many things going on not sure if I'm going to find the time. 

I did get a card made for my Great Great Niece Berkley. She is turning two. She is having a Toy Story themed party.


So I printed out a Jessie Image and was planning on coloring it and decided it would be fun to let her color It. 

I made a star and added the words color me on it In Design Space. Printed it out with my printer and then just cut it out by hand and Cut out a number 2 and embossed it.

 I also thought it would be fun to add some strips of patterned paper to it. 

I don't remember ever adding strips of paper to a card and really thought it was fun. 

Because I didn't color the Image, this card actually came together fairly quickly.

 I actually made a sketch of the card of what I wanted before I started. I think it makes the process go by a little faster if you have an idea in your head of what you want. 

That's going to be it for me today. I do have some birthday things coming up. Hopefully I can get something created for Halloween. Just not sure if I will get the time.

Again thanks for stopping by. Hope you have a wonderful day.


Stay Safe and Stay Crafty!


  Challenge entered-

 Seize the Birthday #202 Birthday option -Texture

Cardz TV. #126 Anything Goes

Not Just Cards Anything Goes

Krafty Chicks #530 All Occasions  

Lets Create Challenges #164 AG+ Use paper strips instead of ribbon 

All Sorts Challenge #595 Celebration Time


Tuesday, October 20, 2020

Sunflower Card & Peaches and Cream Pie

  Hello so glad you could stop by. Are any of you enjoying the beautiful fall days where your from? It has been so nice here. The trees are beautiful right now. 

Needed a birthday card for one of my sister's and decided I would make a card from a bundle that I bought from Dreaming Tree and wanted to share it with you all.


Loving that this was so simple to make. Just had to cut the layers with my Cricut.

Cardstock that I used was Crushed Curry, Summer Sun, Close to Cocoa and white.

 I did add some sparkly yellow dots to the corners and stamped some speckled dots for the middle of the flowers. The sentiment is from a stamp set from Cardz TV. I also added a little twine behind the sentiment.

Have you ever checked out Dreaming Tree? Love all the awesome 3D SVG designs and they have several free cuts.

Here is a link if you would like to check it out. 

Dreaming Tree 


Challenges entered-  

Bitten by the Bug 2 - Feels like Fall

CardzTV.- #125 Anything Goes

Shopping our Stash #431 Happy Fall Ya'll

The Sisterhood of Crafters - Lots of Layers

Creative Crafters  -Anything Goes

Lil Patch of Crafty Friends - # 144 Always Anything Goes

Crafty Creations - #414 Anything Goes

Use YourStuff - #408 Autumn / Fall


 Sharing another recipe with you. This one is a Peaches and Cream Pie. It is so yummy.

 If you love peaches as much as my family and I do, then you will have to give this one a try.


Peaches and Cream Pie

Ingredients

3/4 cup All purpose flour

1/2 tsp. salt

1 tsp baking powder

1 (3 ounce) pkg of  Non- Instant vanilla pudding mix

3 Tbs softened butter (I melt mine in Microwave)

1 egg

1/2 cup milk

1 (29 ounce) can sliced peaches (drained and syrup reserved)

1 (8 ounce) pkg softened cream cheese

1/2 cup white sugar

1 tsp cinnamon


Preheat oven to 350 

Grease sides and bottom of a deep dish pie pan.

In medium bowl, mix together 

flour, salt, baking powder and pudding mix

Mix in softened butter, egg and milk. 

Beat for 2 minutes. Pour into pie pan. Place peaches on top of mixture.

In small bowl, beat softened cream cheese until fluffy. Add 1/2 cup sugar and 3 Tbs of reserved peach syrup. Beat with mixer for 2 minutes.

Spoon mixture over peaches. Keep mixture about an inch away from the edge of dish.

Mix together 1 Tbs of sugar with 1 tsp of cinnamon and sprinkle over top.

In preheated oven bake for 30-35 minutes.Will be golden brown. Chill for at least 2 hours before serving.

Tip-
I bake it on a pizza pan, Easy to get out and don't have to worry about a mess in the oven.


Thanks for stopping by. If you try this yummy dessert, please come back and let me know how it turned out. 


Stay Safe & Stay Crafty


Sunday, October 4, 2020

Walker's Birthday Card and Crescent Roll Apple Dumplings


  Hello Crafty friends. Thanks for stopping by. Yesterday was my grandsons birthday. He turned 15. Before I know it he will be driving.😲

 Kids just seem to grow up so fast and I don't really like it. Wish there was a way to slow down time.

I had decided that I wouldn't make him a card. But being a card maker I just couldn't help myself. Also there were some challenges I wanted to enter.

 So yesterday before we gave him his presents I was grabbing cardstock, adhesive, stamps and starting up my Cricut. I knew I didn't have much time so I thought the number 15 would work perfect. 

This may have been the fastest card that I have made. Ha! 

I'm glad I decided to make it. He really liked it and that's what card making is all about.


Since the grandkids are living next door now. They stop in here first because their Mom isn't home from work yet. 

 They are tired and hungry when they get home. So I decided to make one of their favorites.

They were super excited that I made them some Crescent Roll Apple Dumplings. I usually make these in the cold winter months but It's now fall and already having some chilly days.

So I thought I would share the recipe with all my crafty friends.  I'm sure you and your family would like it to. It's really good served with vanilla Ice cream.


Crescent Roll Apple Dumplings


Ingredients you will need:

2 (8 each) cans Crescent Roll dough

2 large apples

2 sticks of butter

1 1/2 cup brown sugar

1 tsp vanilla

1 tsp cinnamon  (I put a little extra)

1 1/2 cup sprite


Preheat oven to 350 and butter a 9x13 pan


In a medium to large  microwave bowl melt butter.To that add cinnamon,sugar and vanilla. Mix well. Set aside.

Wash apples, peel and slice into 8 slices. Open and separate dough. Sprinkle a little cinnamon on dough, place apple slice and roll up.

Place in a buttered 9x13 pan. Pour mixture over apples. Pour sprite around the edges and in between the apples. Don't pour it over top.


Bake for 35-45 minutes or until golden brown. I loosely place aluminum foil over the top the last 15 minutes or so to prevent burning.  


Thanks again for stopping by. If you try this yummy recipe let me know how it turned out. 

Happy day to you all.


Stay safe and stay Crafty!


  Challenge entered-

Cardz TV.  #124 Anything Goes 

Cut It up Challenges - #210 World Cardmaking Day

Love to Craft -#51 Anything Goes

Through the Craft Room Door - Anything Goes


Tuesday, September 29, 2020

Welcome Home Card


 Hello crafter's. So happy you stopped by. If you have read some of my recent post, then you know that my daughter and grandkids have moved next door. I am sooo happy to have them so close.

 They spent their second night In their new home last night. She had us over last night for supper and I helped my granddaughter Scarlett paint her bedroom. This is the second time she has painted. Didn't like the color the first time. She is so excited to finally have her own room.


So I want to share with you a card that I made them. A welcome home card.


 My daughter was so excited to put up their new mail box. So I thought this image was perfect. 


 Also wanted to let you know that I had a wonderful time on my vacation. 

Went back to Sanibel Island and had the best time. Stayed in the same Condo as last year. It's the closest one to the water and the best view.

One day I was in the water looking for shells and a dolphin was about 10 feet from me. Splashing and flipping around. It was wonderful and my favorite moment of the whole trip. 


Taken on the last day that I was there. (I didn't want to leave)


 This is where I would sit and look for dolphins and watch the birds. Love watching them.


Here is a few pictures of some of the shells I found. Didn't get as many as I did last year. 


That's it for me, Hope that you enjoyed your visit. Happy day to you all and hope you can make it back.


  Challenge entered-

CardzTV.#124 Anything Goes 

Avenue 613  Anything Goes- twist- use a charm 

Colour Crazy Challenge  #38 Anything Goes Colouring Challenge

Alphabet Challenge  Anything stating with the letter M- (mailbox)

Lil Patch of Crafty Friends  #142 Always Anything Goes 

Crafty Catz weekly Challenge  #520 Anything Goes 

Creative Crafters Challenge #32 Anything Goes 

Word Art Wednesday #458-#459 Anything Goes


Tuesday, September 15, 2020

Yellow Finch Tag Card and Chocolate Chip Zucchini Bread

  Hello my people, yes if your a paper crafter, then you are my people. Ha

Today I am sharing with you a birthday card that I have made for one of my sister's. She told me awhile back that she wanted a bird on her card this year. So of course I had to make her one.


I love sitting on my porch watching the birds and so does my sister. We both get the feed sacks that are for the yellow finch.  So I went with that type of bird for her card.

I used the stamp set from Hero Arts called Bird & Branch. I am so happy I bought this set. Love that I can make so many different colored birds. 

Another stamp set that I used is Itty Bitty Backgrounds from Stampin Up. It's retired now and I still use it all the time. You can verily see where I used it on the tag.

I thought the tag was to plain so I used a stitched scallop die on the bottom from Pretty in Pink called Stitched Borders. I like how it turned out.

The Inks I used to make the bird are Barely Banana,Summer Sun and Memento Black. 

For the flowers I used Lavender Lace and Gorgeous Grape. I also used a little purple Stickles in the center of each flower. Used Old Olive for the leaves and Close to Cocoa for the branch and bird legs.

The blue card stock was in my scrap box. I think it's Bashful Blue from S.U. Wish they had never retired it. 

The black and white polka dot paper was in my paper scraps. Also used my Woodgrain embossing folder.

Tied white sheer ribbon through the tag and tied twine around the ribbon and added one purple sequins. Hoping she enjoys her card.


I also have another Zucchini recipe to share with you. This time it's with Chocolate...... YUM!


Chocolate Chip Zucchini Bread

Ingredients needed -

 1 c. Zucchini shreeded

1 egg

1 1/2 c. flour

1/2 tsp baking powder

1/2 tsp baking soda

1 tsp cinnamon 

1/2 c.brown sugar 

1 pinch nutmeg

1/2 tsp. salt

1 c. semi sweet chocolate chips

1/2 c. sugar 

1 tsp. vanilla

1/2 c. oil

1/2 c. greek plain yogurt


Preheat oven 350

Butter loaf pan and set aside.

In large bowl combine dry ingredients - flour, baking powder, baking soda, salt, cinnamon and nutmeg.

In another large bowl combine wet ingredients - eggs, oil, brown sugar, white sugar,yogurt and vanilla. Whisk until combined.

Add dry ingredients to wet and fold in gently.

Add Zucchini  and chocolate chips. Mix

Pour in buttered dish and bake for 40 - 45 minutes. or until toothpick comes out clean. Let cool for at least 20 minutes. Enjoy!!! 


 I will be leaving in just a few days. Heading to Sanibel Island for a week. It will be so nice to go again. Went last year and loved It. Hoping to find some big shells this time

So I won't have anymore post until after that. Hope you can make it back sometime. If you try the recipe,let me know how you like it. 

That's all from me, Happy day to you all. Stay Safe and Stay Crafty my friends.


 Challenges entered-

All Sorts Challenge - #589-  I Love.......' Belated Birthday Celebration 

( I Love Birds, flowers, stamping and embossing and I love the color purple).

We Love Chocolate Baroque September- Wings with an anything goes option

My Time to Craft - #440 Embossing wet or dry

International Art and Soul #92  Tic Tac Toe (Image, Die, Embossing)

 Cardz TV.  #123 Anything Goes  

Through the Purple Haze  #171 Anything Goes w/ twist- Stitching real or faux

Not Just Cards - AG September Challenge

2 Crafty Critters - #42 September Challenge- Use a Critter

Sir Stamp alot Challenge -September Challenge- The Great Outdoors

Creative Knockouts #367 Lots of Layers 

A Perfect Time to Craft  #9 September Challenge- Anything Goes 


Saturday, September 5, 2020

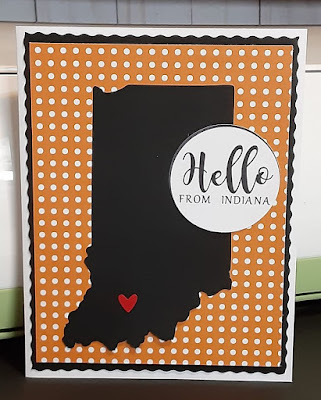
Hello from Indiana & Lemon Zucchini Bread


 Hello from Indiana, Thanks for stopping by. Hope you all are doing well. Do any of you feel like our world has turned up side down? We are living through some crazy times right now.

One thing I can do is go to my craft room, (My Happy Place) turn some music on and make a card or some other kind of paper crafts.💜

On one of the facebook groups that I am in. You can sign up to receive happy mail from others and you also can send happy mail out.  They also have swaps and other fun things.

So far I have received happy mail from thirteen ladies. It has been so fun receiving cards and some little surprise goodies from other's.  You just never know what you might get. Yesterday I sent out some Happy Mail for the first time. Hope they enjoy the goodies I sent.

The facebook group is called Let's Make Cards, It's a great group of crafter's from all over the world.

On the facebook page they even have a map that you can print out so that you can color in the states when you receive mail from there. 

One of the big things right now is napkin cards. I have received some napkins and  I love them. I have one picked out to make for my Mom's birthday.


Today I am sharing with you a few of the cards I have made to send to the sweet ladies that have sent me happy mail. 


  I did send out a fall looking one to, but forgot to take a picture. I think they are cute. 
I do like the idea of sending someone a card with your state on It.

The first picture shows the little envelope I made to put the goodies in.

Found the state image on google and printed it out on my Cricut. 

I also figured out out how to cut more than one thing out at a time on my Cricut. Yeah!!!


So if that sounds fun to you and would like to join the group, head on over there and get signed up.


 Also If you look on the right side of my side bar, I have several recipes that I have shared with you all. Well today I have another one. 

I have been making several things with zucchini and have already shared my Cinnamon Swirl Zucchini Bread. So today I'm sharing a zucchini bread with lemon. 


Lemon Zucchini Bread

Ingredients that you will need

 1 c. grated zucchini

1- 1/2 c. flour

1/2 tsp baking powder

1/2 tsp baking soda

1/2 tsp salt 

3/4 c. sugar

2 large eggs

zest of one lemon

1/2 c. vegetable oil


Preheat oven to 350

In large bowl, whisk together flour, baking powder, baking soda and salt 

In another large bowl combine sugar and lemon zest. mix well

add eggs, oil, lemon juice, stir until combined.

add zucchini and mix. Then add dry ingredients and mix. 

Pour into a greased and floured loaf pan. Bake for 25 minutes and then place foil over top and bake an additional 20-25 minutes. You may not need to use the foil but my oven will burn it if I don't. 

You can also check to see if it's done by inserting a toothpick in the center and see if it comes out clean.

It needs to cool for 10-15 minutes before removing from pan.

While cooling you can make the glaze

Glaze

1 c. powdered sugar

4 tsp lemon juice

mix and pour over bread


This bread is perfect for summer and just another great way to use up zucchini.

  Let me know if you give it a try.  Thanks for stopping by. Stay safe and stay crafty!


 Challenge entered-


Cardz 4 Galz #129 Just saying Hello

Cardz TV#122 Anything Goes 

Crafty Catz #517 Anything Goes- optional twist Not square 

Love to Scrap#137 Anything Goes 

Love to Craft#50 September Anything Goes 

Crafty HazelnutPatterned Paper September